AppleInsider is supported by its audience and may earn commission as an Amazon Associate and affiliate partner on qualifying purchases. These affiliate partnerships do not influence our editorial content.
If you’re running low on iPhone storage, you don’t have to permanently delete your precious images or app data. Here’s how to squeeze more space to use within iOS.
It’s a frequent occurrence for iPhone owners who have smaller-capacity smartphones, fighting the constant battle to have enough storage space available for their data or to install a new app. Though it’s not as much of a problem now as a few years ago, thanks to better access to cloud storage services and generally larger capacity options, it’s still a problem to some users.
This is particularly true for those with older iPhone models, handed down as other family members upgrade theirs to newer versions. You don’t have a choice in how much storage you get to play with, so you’ve got to work with what you’ve got.
Part of the problem is that not everyone wants to delete their photographs or videos, as they don’t want to lose any of their precious memories. Similarly, not everyone wants to delete apps from their device just to free up space to install another one.
So, how can you get more space without permanently getting rid of apps or your media?
Contents
How much do you have left?
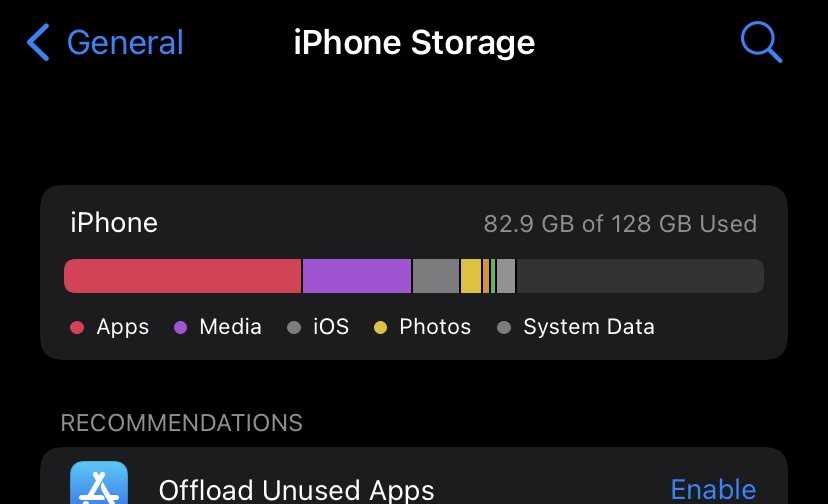
If you want to see a summary of your storage problems, you can do so on your iPhone in a fairly simple way. In Settings, if you select General then iPhone Storage, you will see a number showing how much storage has been used up.
Below it is a bar that shows how much storage is being used in various ways, divided up into a few categories: Apps, Media, iOS, Photos, and System Data. It’s not a great amount of detail, but it does give you a general idea of whether you’ve overloaded with apps or if it’s something else consuming space.

The operating system will also provide more recommendations on what to do, such as offloading unused apps, which we will get to later.
If you want a more accurate breakdown of your device’s storage, you could get that by hooking it up to your Mac and opening up Finder, or in Windows, viewing the iPhone in iTunes.
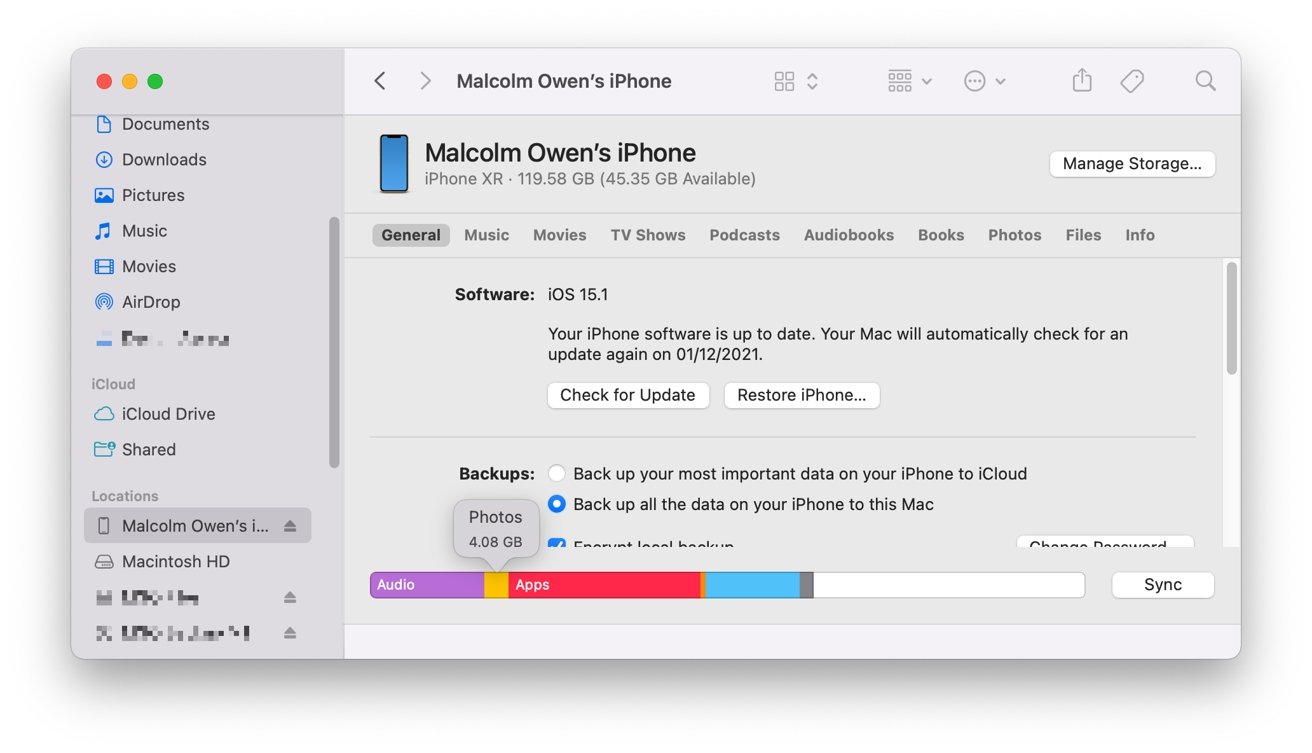
Connect the iPhone to a Mac to get more accurate figures for the storage categories.
A similar bar at the bottom of the screen shows a generalized breakdown of what’s in your storage, with more detail available when you mouse over each section. More importantly, it tells you exactly how much storage is being consumed by each category.
Photos and iCloud
If internet connectivity isn’t a problem, then taking advantage of it to solve your photo problem could be one way to solve the problem.
For a start, there’s Apple’s iCloud, which gives you 5GB of storage for free. Though a little small, this could be used to hold some photographs, but you could consider getting more, and Apple’s options are quite reasonable in cost.
On its own, iCloud+ costs $0.99 per month for 50GB, rising to $2.99 for 200GB, and $9.99 for 2TB. If you are part of a family group, it’s more justifiable to pay for storage as you can share it with other users.
If you pay for other Apple subscriptions, such as Apple Music or Apple TV+, consider getting Apple One, as you could save a bit of money, as well as gaining cloud storage. The individual plan, which costs $14.95, includes 50GB of iCloud as part of the package, while the $19.95 Family option has 200GB of iCloud, and Premier at $29.95 bumps the storage to $9.99.
There’s also the option of looking to other cloud storage services, which can provide free storage for images, such as the 15GB allowance of Google Photos. If you’re an Amazon Prime subscriber, you could also take advantage of Amazon Photos’ unlimited photo storage offer.
Given the integration with Apple’s ecosystem, iCloud is probably the best option, but your mileage may vary.
If you want to store your photos on iCloud, you can set Photos to do so within iOS. Using iCloud Photos helps in other ways than just being storage, such as enabling your image and video collection to be viewable on other devices connected to the same Apple ID.
There are two settings to enable here.
How to set Photos to save to iCloud on iPhone and optimize your storage
- Open Settings.
- Scroll down and tap Photos.
- Tap the toggle next to iCloud Photos so it is on.
- Tap Optimize iPhone Storage to select it.
By enabling these two settings, your iPhone will automatically upload your images to iCloud, so long as you have sufficient storage.
The Optimize option is a feature where it will replace full-resolution images on your device with smaller versions that work better with your iPhone. The full-resolution originals are safe on iCloud, and can be redownloaded at any time.
Apps and Offloading
If too many apps is the problem, then the obvious answer is to delete them from your device. However, doing so may delete any associated data with it. Not created files purposefully saved by the user, but things like caches.
That may not sound like a problem, but given that you can redownload bought apps from the App Store at a later time, it could be. The deleted data could include things like save files for games, or settings you may have configured, or more important data that you may have fed into the app.
There’s a less destructive way, and that’s called offloading. Rather than deleting everything related to an app, offloading will delete the app itself, but retain any user-specific data.
As well as making it quicker to get back to where you were, it also makes it easier to re-download the app, as the icon still remains on the Home Screen. You simply tap the icon for an offloaded app, and it will download and install once again.
You can manually offload apps from iOS, especially if you know what to get rid of, but you could always leave it to iOS’ judgment.
You can set iOS to offload unused apps if needed, but you can manually do it too.
Enabling the automatic option doesn’t mean apps will be deleted immediately, as iOS will only do so if it is at a low capacity. It will also work based on what apps you don’t use, with the least-used apps being offloaded first.
How to enable Offload Unused Apps in iOS
- Open Settings.
- Tap General.
- Tap iPhone Storage.
- Next to Offload Unused Apps, tap Enable.
The option will also show an estimate of how much storage you could reclaim immediately, with apps that iOS deems underused and deletable.
How to manually offload apps in iOS
- Open Settings.
- Tap General.
- Tap iPhone Storage.
- Tap an app to remove.
- Tap Offload App.
- Tap Offload App to confirm.
Podcast Bloat
If you are an avid podcast listener, movie watcher, or consumer of some form of media that can be downloaded and enjoyed on your iPhone, you may want to have a poke around the settings of your apps. There’s a good chance that gigabytes of data is being used up by podcasts that you’ve listened to but haven’t deleted yet, or something similar.
In some cases, there are settings to automatically delete media after it has been watched or listened to. This is especially true for the Podcast app in iOS.
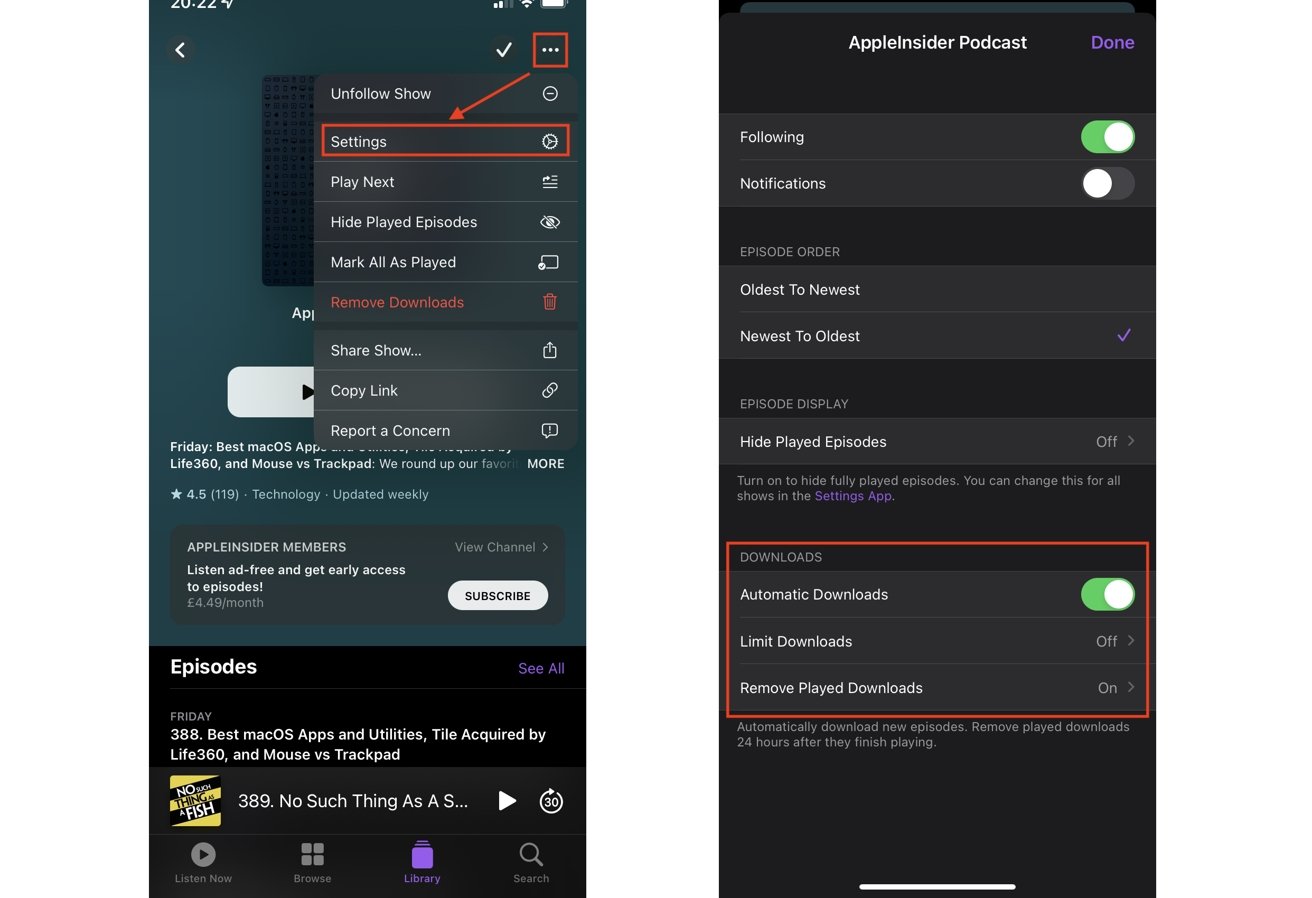
You can set Podcasts to download fewer episodes, and to delete them after listening.
For a start, you could simply be downloading too many podcasts for you to adequately consume. This can certainly be the case if you follow multiple weekly podcasts, as you can easily build a backlog up.
In the Library section of the app, you can select a show to bring up your playlist for it. If you then tap the three dots then Settings, you can change the settings for that particular podcast.
For example, you can limit downloads to the most recent few, or only those published in the last two weeks or the last month. Changing this fundamentally alters how many episodes are available to you at a time, and your ideal setting will depend on the release and listening rate.
At the bottom is a very useful function, titled “Remove Played Downloads.” As the name suggests, it will tell Podcasts to delete the episode if it has finished being listened to by you 24 hours after completion.
This option is probably the best to enable anyway, unless there happens to be episodes you want to keep and re-listen to.
Also, remember that you can also delete individual episodes manually, and can set specific podcast shows to not automatically download, if you want to exert more control over what episodes to listen to.
While podcast downloads can easily be a problem for users, other media-heavy apps can offer the same sort of problem. This is often the case with video apps that allow temporary downloads of content, such as Netflix.
You can manage this type of content within each app, but some allow you to delete the media within Settings. After going to the iPhone Storage section and selecting the app, there may be a section at the bottom for “Downloaded” content, complete with a list of all downloaded items.
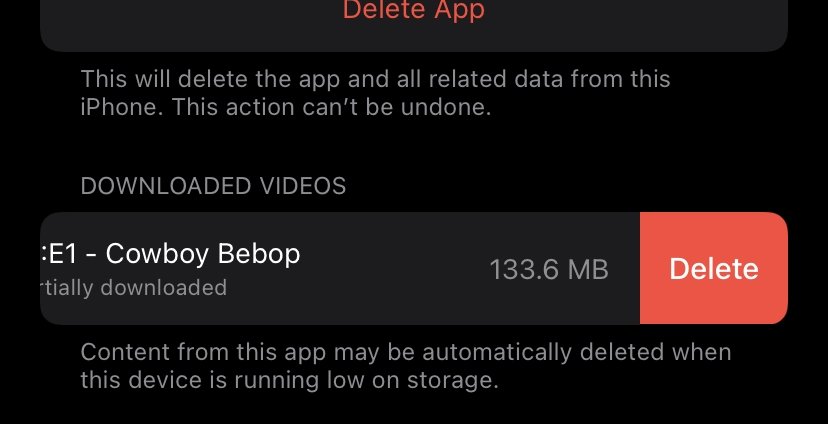
Not only can you delete media from within relevant apps, but you can also sometimes do it from Settings.
To delete each one, swipe the file from the right-hand side, or perform a short swipe and then tap Delete.
Doing this within Settings could be easier than going to each app in turn, as you can see the size of each app within the menu, giving you some idea of which may have deletable files.
There’s also a notification from iOS that it may automatically delete the files if it is low on storage. This makes it less of a concern to users, but an occasional check to prune the collection isn’t a bad idea.
iMessage Messages
Conversationalists and those who send photographs and videos to each other in iMessage may find that their in-depth discussions could be increasing storage consumption. Text alone isn’t a massive contributor, but years of archives could eventually consume gigabytes, depending on verbosity.
There are a few ways to solve the problem, starting with limiting how many messages get stored on your device.
If you’re a heavy texter, set iMessage to keep less of an archive.
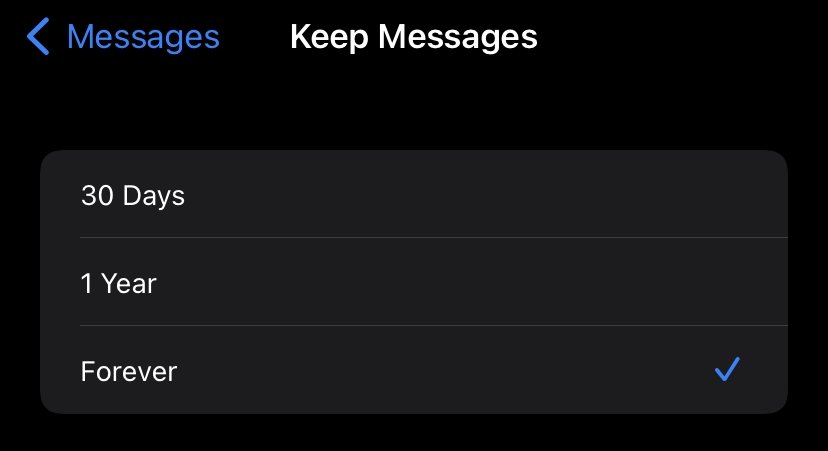
How to change message history in iMessage on iOS
- Open Settings.
- Scroll down and tap Messages.
- Tap Keep Messages.
- Select from Forever, 1 year, or 30 Days.
Obviously, the shorter the duration, the less time the messages will be retained for, and so it will consume less space.
A second way that can be more useful is to enable iCloud for Messages. This involves iCloud getting a copy of your iMessage conversations, which can be stored and also shared with other devices using the same Apple ID.
How to enable iCloud for Messages on iOS
- Open Settings.
- Tap your name.
- Tap iCloud.
- Turn on the toggle next to Messages.
After iCloud has retained all your messages, it will automatically start deleting your on-device message archive to make space if it deems the iPhone has low remaining storage available. You will still be able to access earlier messages in your conversational history, but they will be re-downloaded from iCloud.
Overbrowsing with Safari
Just as you may find with desktop browsers, it’s possible that temporary internet files could fill up your cache, and in turn, take up precious storage capacity. While Safari is usually quite good at managing that data, it may be worth occasionally nuking the cache completely and starting from scratch.
Clearing history and website data in Safari can help, but it does affect all your Apple ID-connected devices, so tread carefully.
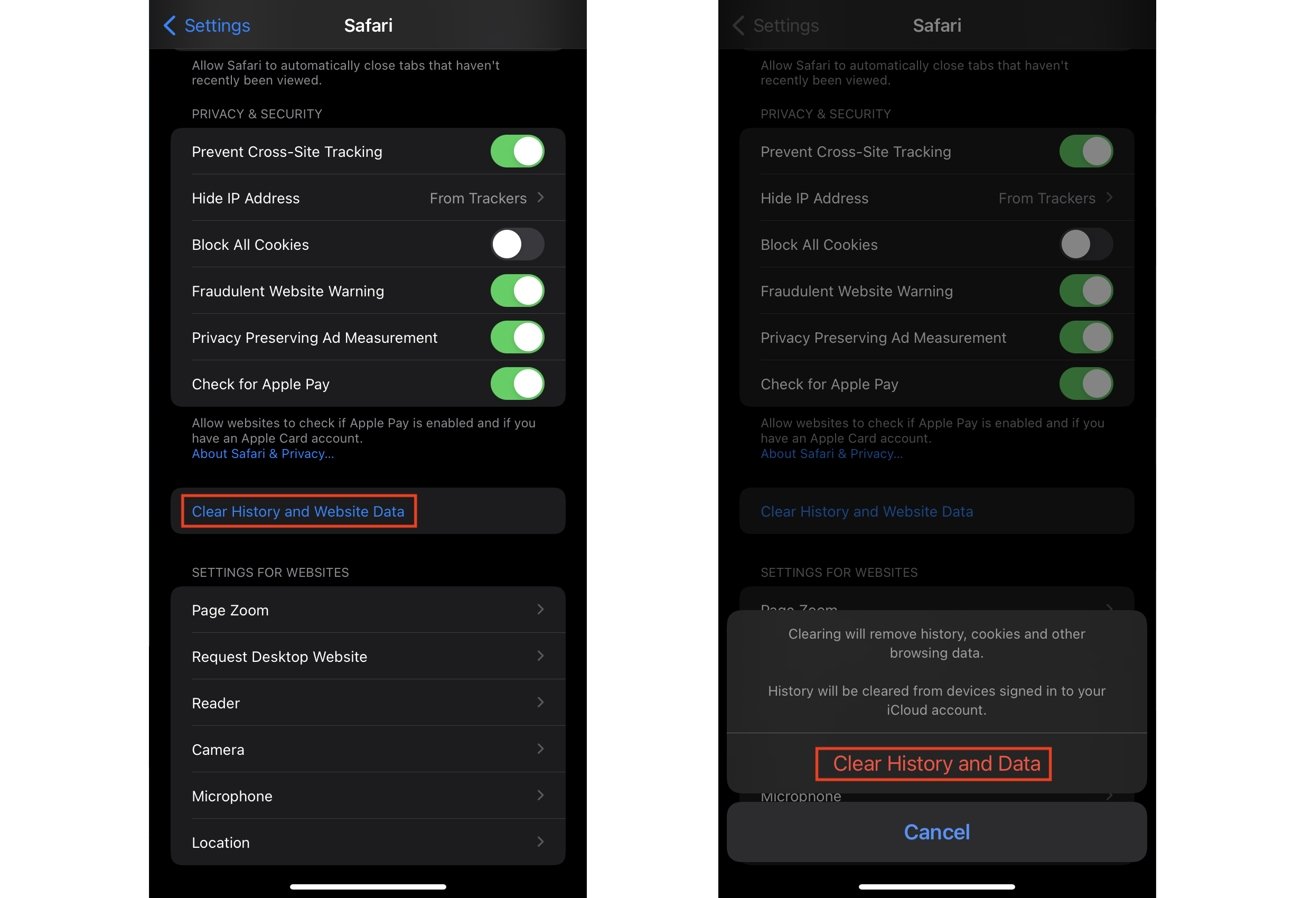
How to clear Safari’s cache on iOS
- Open Settings.
- Tap Safari.
- Tap Clear History and Website Data.
- Tap Clear History and Data to confirm.
You are warned before completing the action that it will remove “history, cookies, and other browsing data.” Furthermore, the action will also apply to all devices signed into the same Apple ID, so you may not want to do this if you have other hardware you don’t want to wipe.