Everyone immersed in the Apple ecosystem can quickly entry iCloud for no added cost, but there are a couple of tips to learn to make the most of it.
Apple’s iCloud is not an software, but fairly an software suite, a single which is right baked into the framework of practically all Apple items. It’s designed to be a repository of your digital existence, a position to store and backup your pics, particular files, and software facts so you hardly ever drop anything. Regardless of its slick layout and basic execution, nevertheless, placing it up for the initially time can be a agony. We have set jointly a guideline on how to use iCloud.
Contents
Placing up and signing into iCloud
Signing up with iCloud is entirely free of charge and simple to do with an Apple ID. Each and every absolutely free account quickly grants you access to 5GB of remote storage — readily available for backups, mail, application information, paperwork, and other elements saved in the cloud — with 50GB, 200GB, and 2TB storage offerings accessible at an more cost.
If your units are new, you should not have any challenges with compatibility, but we suggested quickly scanning above the bare minimum requirements to get a improved comprehending of what will and will not function on your system. Afterward, stick to the recommendations for your respective device below.
Setting up iCloud on MacOS
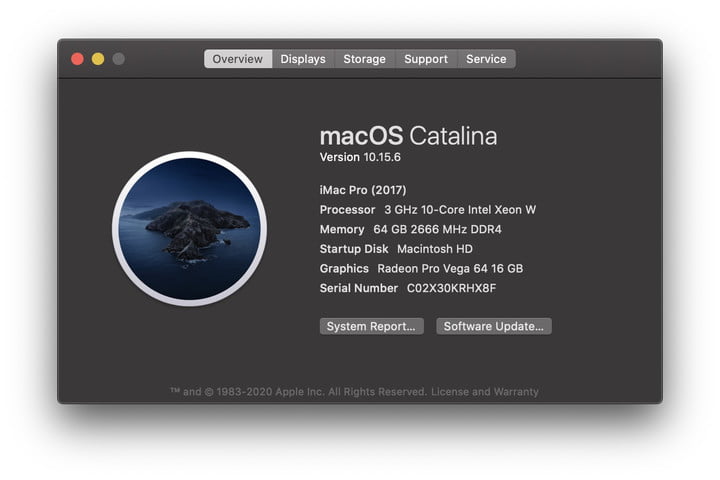
Phase 1: Update your Mac (optional) — It’s often a great notion to update MacOS prior to setting up a new utility or application on your iMac or MacBook. If you haven’t completed so already, click the Apple icon in the upper-left corner of the desktop to access the principal Apple menu, and pick out About This Mac. Then, simply click the Software Update button. The Application Keep ought to open up. Head in excess of to the Updates tab, then click on on the individual computer software you want to update. Or, click Update All in the higher-suitable corner of the application window to download and install all accessible updates.
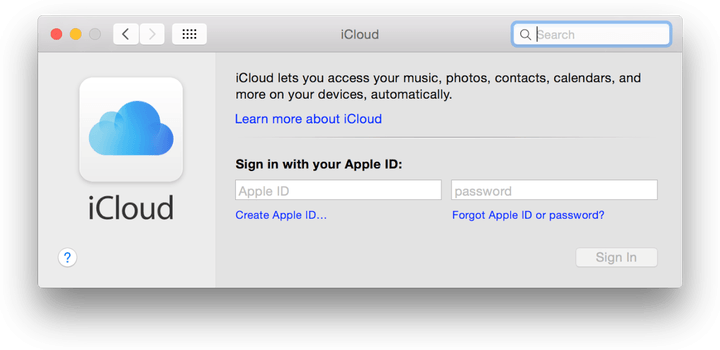
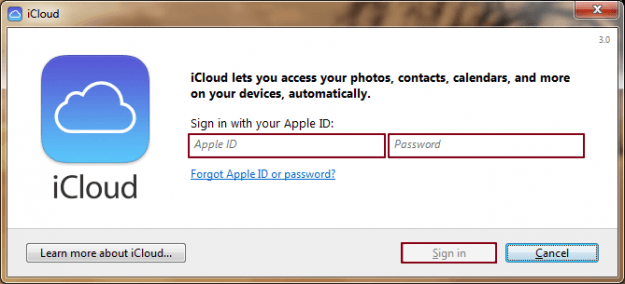
Stage 2: Allow iCloud — Once once again, simply click the Apple icon in the upper-remaining corner of the desktop to entry the key Apple menu. Afterward, select Method Preferences from the drop-down menu, and select the iCloud solution in the Program Tastes panel (the brand is a blue cloud). Enter the Apple ID and password you want to use with iCloud and click the Signal In button right to the ideal of the password industry when completed. It’s also by no means a poor strategy to pop that password into a password supervisor at this place.
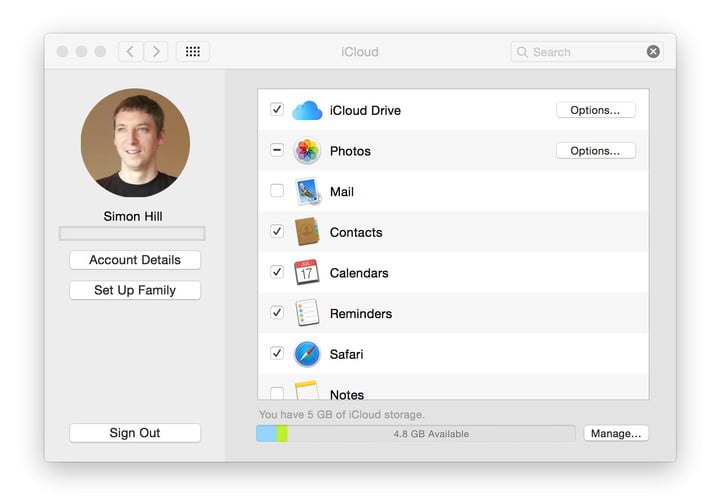
Action 3: Find your iCloud companies — iCloud will current you with several personal services, from mail and Safari to contacts and calendars, when signed in. Check the box right to the left of the purposes to decide on which kinds you’d like to sync throughout your various equipment. Syncing choices fluctuate from software to software, but you can ordinarily fine-tune the process by clicking Possibilities on the ideal or from in just the main Accounts location of each and every company.
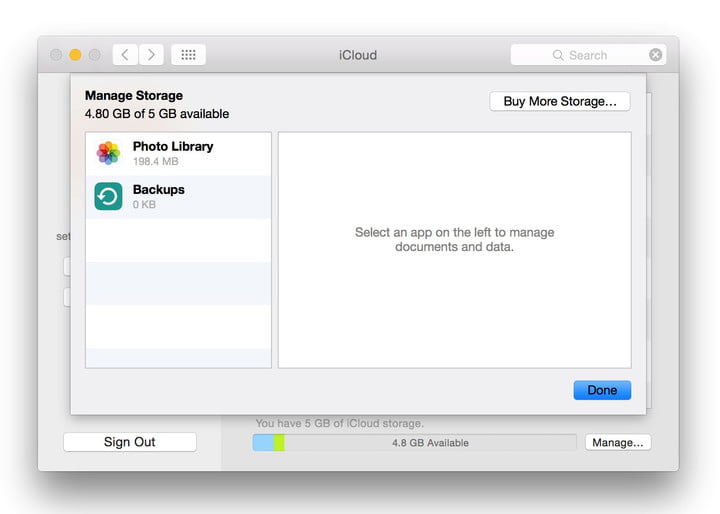
Action 4: Acquire additional storage (optional) — Acquiring a very little extra storage can’t damage if you are on the cusp of achieving your storage cap. To do so, simply click the Manage button in the base-ideal corner of the primary iCloud interface, adopted by the Get A lot more Storage button found in the prime-right corner of the window.
Step 5: Check out optimized storage (optional) — All correct, so you are all established up, and you have your iCloud storage, your Apple ID, and your shiny new Mac. If you have been away from the MacOS ecosystem for a when, there’a aspect you need to know about: It’s termed Optimized Storage, and it works by using your iCloud storage to free of charge up even much more tough travel area on your Mac. Test out our full guide on how to get it all set up.
Location up iCloud on iOS
Move 1: Update your iOS system (optional) — It is always a superior notion to retain your iOS equipment up to day, especially with the release of iOS 13. If you have not completed so currently, tap Options located on your device’s home display screen, adopted by tapping Standard, then the Computer software Update possibility and the resulting Down load and Install button. Wait around for the most current version of iOS to down load and set up prior to continuing to the subsequent phase.
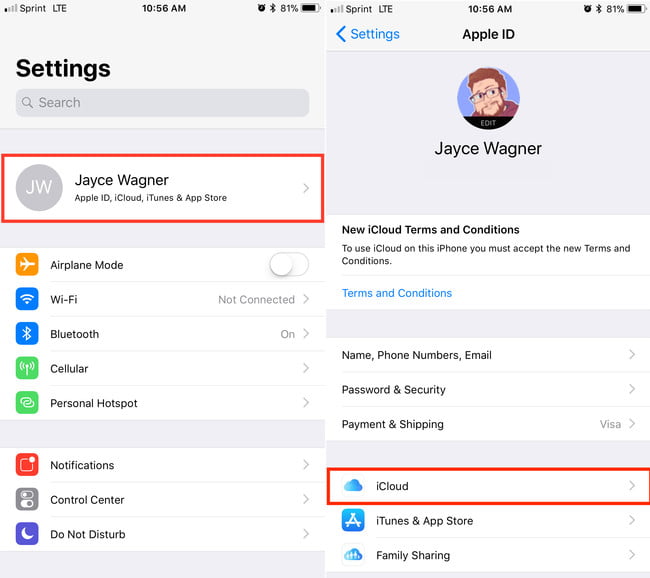
Action 2: Permit iCloud — Faucet Options positioned on your device’s property display. Afterward, tap your identify up at the leading. You may well be prompted to log in to your Apple ID. On the upcoming menu, click on iCloud.
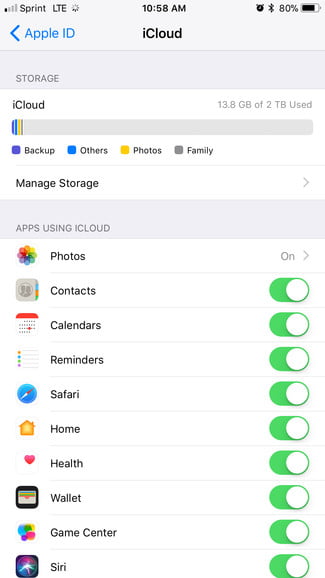
Action 3: Select your iCloud services — iCloud will present you with a listing of products and services. Just toggle the slider instantly to the right of the application to select which ones you’d like to sync across your different units.
Placing up iCloud on Personal computer
Move 1: Enable iCloud on one more machine — Apple’s iCloud program is intended to operate seamlessly with iOS and MacOS. Start by enabling and location up iCloud on yet another device prior to placing up the program on your Home windows Pc. Fortunately, the two tutorials higher than will assistance you get began on the two your Mac and iOS machine.
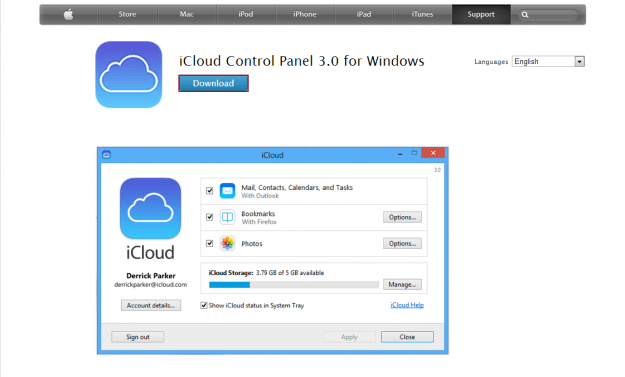
Move 2: Down load and set up the iCloud Command Panel — However, Windows does not feature constructed-in iCloud integration of any type (surprise, shock). If you are largely a Windows consumer, you may want to contemplate a distinct cloud storage answer. Navigate to the Apple support site, and simply click the blue Download connection at the top to download a duplicate of the iCloud Regulate Panel. Afterward, pick a conserve place from the ensuing window, click on the Save button in the bottom-suitable corner, and run the installation computer software when it’s completed downloading. The bundled wizard will wander you as a result of the full installation procedure.
Stage 3: Enable iCloud — Launch the iCloud Management Panel and enter your Apple ID and password corresponding to your previously-registered iCloud account. Click the Sign In button in the bottom-right corner when finished.
Move 4: Pick your iCloud expert services — Once signed in, iCloud will current you with 4 providers, including iCloud Push, mail, bookmarks, and contacts and calendars. Check the box right to the left of the companies to pick which ones you’d like to sync across your different products. Syncing alternatives differ from application to software, but you can usually good-tune the approach in just the main Options environment of each individual assistance. Click the Apply button in the bottom-ideal corner when completed.
Backing up and restoring iOS units with iCloud
Apple’s iCloud could be a marvelous way to sync data between your Apple iphone, iPad, and personal computer, but the application also offers an effortless way to again up your equipment. Backup facts includes anything from product options, like your picked out wallpaper and application business, to direct buys from the App Store and text messages.
How to back again up to iCloud
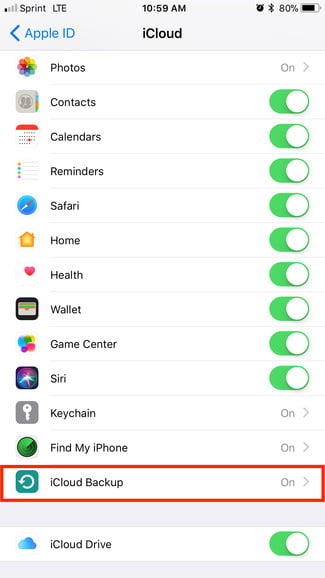
Move 1: Navigate to the iCloud storage settings — Tap Settings > Your Apple ID > iCloud.
Action 2: Toggle on iCloud Backup — At the bottom of the iCloud website page, you’ll be able to toggle on the iCloud Backup alternative to make it possible for the computer software to automatically again up your digicam roll, accounts, documents, and configurations when your product is plugged in, locked, and linked to Wi-Fi. Alternatively, faucet the Again Up Now solution to manually again up your machine when related via Wi-Fi.
How to restore from iCloud
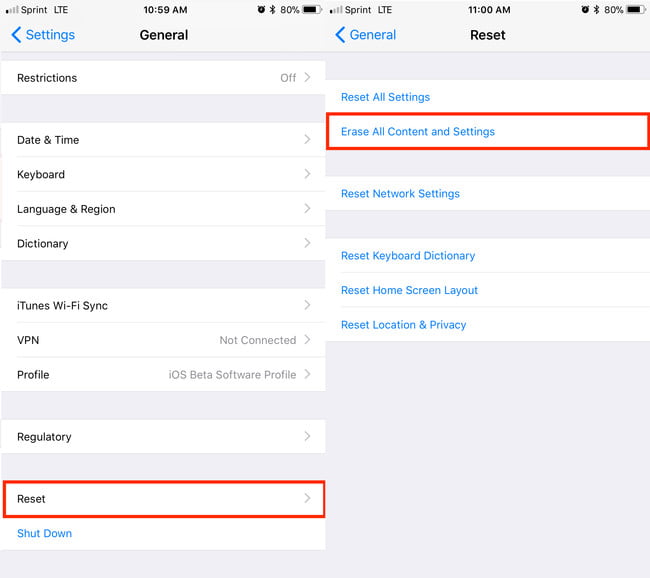
Stage 1: Begin from the commencing — All recent iOS equipment supply a set up assistant that makes it possible for you to restore your machine from a backup. Having said that, if you have by now opted out of restoring from iCloud in the course of the original setup method, you just will need to reset your gadget to its manufacturing unit defaults to access the same setup assistant highlighted on new units. To do so, faucet Configurations > General > Reset > Erase All Contents and Options. Tap Erase iPhone to verify. If you have an more mature Iphone, your ways could possibly differ a small, so be positive to look at out our complete guide if you’re having hassle.
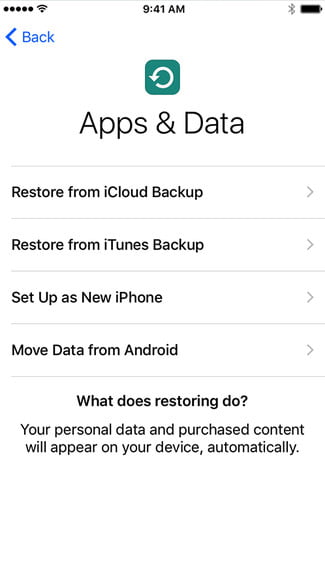
Move 2: Restore from backup — As soon as you have started the first set up assistant, you’ll be prompted to possibly set up a new system, restore from iCloud, or restore from iTunes. Select Restore from iCloud Backup, enter the Apple ID corresponding to your iCloud account, and faucet whichever choice you’d like to use. If you pick iCloud backup, you’ll see the a few most new backups for every single of the devices on which you have enabled iCloud Backup.
After decided on, the set up assistant will take care of the rest. A progress bar will seem, indicating how extended it will choose to obtain and put in the iCloud backup. When finished, your iPhone or iPad will reset and start off downloading the exact same version of any applications you experienced beforehand mounted on the gadget. Enter the proper password when prompted, and ensure you’re related via Wi-Fi, or your down load could acquire a while.
Deleting iCloud backups
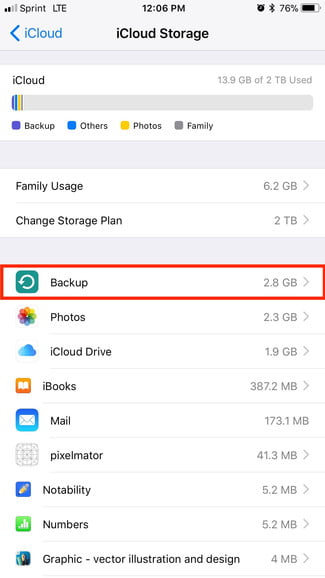
If you have not figured it out already, iCloud is a marvelous and autonomous way of syncing and storing information from all your related iOS equipment. Regrettably, the delivered 5GB of storage only goes so considerably when you’re continually backing up an Iphone, iPad, and MacBook applying the same iCloud account. Luckily, choose backups can usually be manually deleted instantly from your iOS product to cost-free up storage when they grow to be really outdated or in the function you no more time have the machine to which the backup belongs.
Stage 1: Navigate to backup — Faucet Options > Your Apple ID > iCloud > Deal with Storage.

Step 2: Delete the backup — Once you are at your storage administration webpage, pick Backups. Pick the backup you want to delete and tap the red Delete Backup alternative at the bottom of the resulting menu. Every backup will present its relative sizing, the specific day when it was in the beginning uploaded, and which system it’s from, so you shouldn’t have substantially difficulties distinguishing involving the different backups. However, you’ll usually want to preserve the most modern backup.